FormFactory tab
FinePrint can save a job as a form, on top of which other print jobs can
be printed. For example, a letterhead may be saved as a form and subsequent jobs
printed on top of
it. Using FormFactory, you can eliminate the need to print, store and load pre-printed forms.
Steps to create a form:
1. Create the form (letterhead, stock form, etc) in any application and select the Print command from the File menu. Select the FinePrint driver when the Print dialog box appears.
2. When the FinePrint preview dialog appears, click the FormFactory tab.
3. Select the "Create form using current job" button and name your form in the
dialog box that appears. Examples might be, "My letterhead", or "Invoice form".
4. Set the Form option in the FormFactory tab. By default, the form will be
used on every document page. Other options are:
- Print on first job page only - this option applies to single page forms only and signifies that the form will be printed on the first page of the document and not on subsequent pages.
- Do not repeat first form page - this option
applies to 2 page forms only. It signifies that instead of repeating the
sequence of two pages, that the second page of the form should be used for all
document pages other than the first.
- Make this form a paper tray - use this option
if you want to applications such as Microsoft Word to be able to select
FinePrint forms as paper trays. This is useful for mail-merge functions.
The Trays button is used to show which paper tray number is mapped to a
particular form. In general, it is not necessary to access this dialog
box.
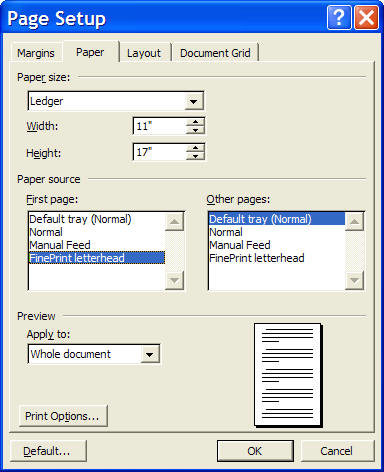
Microsoft Word Page Setup dialog
box showing a FinePrint form used as a paper tray.
5. The form is now ready to use. Click the Close button in the FinePrint
window.
Using Forms
Now that the form is created, you can print other jobs on top of it. This is done as follows:
1. Print the job using the normal FinePrint procedure.
2. When the FinePrint dialog box appears, select the name of the form you want from the Form combo box
in the Layout mini-tab. The preview window will display your current print job on top of the selected form.
Note: "Original" margins (controlled on the Layout mini-tab) will be automatically selected when forms are being used. This is to ensure consistent alignment between the form and the job to be placed on top.
Rename - renames the selected form.
Delete - deletes the selected form.